Welcome to the Knoxville Film Lab Blog
Knoxville Film Lab is excited to announce the launch of our brand new web page and ordering capability! Our goal has always been to make the film developing process as easy and convenient as possible, and our new website takes that commitment to the next level.
Our new website has been designed with our customers in mind, with a clean and user-friendly interface that makes it easy to place orders, view pricing, and get information about our services. We've also added new features that will make the film development process even more seamless and efficient.
One of the most exciting new features of our website is our online ordering capability. Now, customers can place orders for film development and printing directly through our website, making the process faster and more convenient than ever before. Simply select the services you need, upload your files, and place your order - it's that easy!
We've also made it easier to get information about our services and pricing. Our website features detailed information about our film development and printing services, as well as our pricing and turnaround times. Customers can easily find the information they need and make informed decisions about their film development needs.
At Knoxville Film Lab, we are committed to providing high-quality film development and printing services to our customers. With our new web page and ordering capability, we're making it easier than ever before to get the high-quality film development services you need, with the convenience and ease of online ordering.
So whether you're a professional photographer, a hobbyist, or just someone who loves the look and feel of film photography, Knoxville Film Lab has the services you need to bring your images to life. Check out our new website today and experience the convenience of online ordering for yourself!
6 Feburary 2024
Mastering the art of Composition in photography.
Composition is the soul of photography. It's the language through which photographers communicate their vision, emotions, and stories to the viewers. The way elements are arranged within the frame can make or break an image, transforming it from mundane to mesmerizing. Understanding the principles of composition empowers photographers to create compelling visual narratives that captivate and resonate with their audience.
One fundamental rule in composition is the Rule of Thirds. Imagine dividing your frame into a grid of nine equal sections with two horizontal and two vertical lines. Placing key elements along these lines or at their intersections tends to create more dynamic and visually appealing images. For instance, in a landscape photo, positioning the horizon on either the lower or upper third line can enhance the balance and interest of the scene.
Leading lines are another powerful compositional tool. These are lines within the frame that lead the viewer's eye towards the main subject or focal point. A classic example is a pathway winding through a forest, drawing the viewer's gaze deeper into the image. Similarly, a road stretching into the distance or a row of buildings converging towards a vanishing point can create a sense of depth and intrigue.
Symmetry and patterns also play a crucial role in composition. Symmetrical compositions often convey a sense of stability and harmony, making them visually pleasing. Think of a perfectly mirrored reflection on a still lake or a majestic architectural structure perfectly centered in the frame. On the other hand, capturing repetitive patterns, such as rows of identical objects or textures, adds rhythm and interest to the image.
Contrast is another key aspect of composition that photographers utilize to create impact. This can be contrast in colors, tones, textures, or even subjects. A stark contrast between light and shadow can add drama and dimension to a photograph, while contrasting colors can create vibrant and dynamic visuals. For instance, a lone red umbrella against a sea of blue can instantly draw attention and evoke emotion.
Additionally, framing is a technique that involves using elements within the scene to frame the main subject. This could be natural elements like trees or archways, or man-made structures like windows or doorways. By framing the subject, photographers can add context, depth, and a sense of narrative to their images, guiding the viewer's focus and enhancing the overall composition.
In summary, composition is the cornerstone of great photography. By mastering the principles of composition such as the Rule of Thirds, leading lines, symmetry, contrast, and framing, photographers can elevate their work from snapshots to art. These principles provide a framework for creating visually compelling and emotionally resonant images that leave a lasting impression on the viewer's mind. So next time you pick up your camera, remember to think not just about what you're shooting, but also how you're composing it within the frame.
Contact Us
6 Feburary 2024
What is Orthochromatic vs Panchromatic Black and White Film.
In the realm of black and white film photography, understanding the distinction between orthochromatic and panchromatic films is crucial for achieving desired results. Orthochromatic film is sensitive primarily to blue and green light, while panchromatic film is sensitive to a wider spectrum including all visible wavelengths.
This difference matters significantly in photography because it affects the rendering of colors and tonal ranges. Orthochromatic films tend to reproduce scenes with a heightened contrast between blue and green hues, resulting in skies appearing darker and foliage more vibrant. However, red tones may appear darker or even black. On the other hand, panchromatic films provide a more balanced representation of colors, allowing for a wider tonal range and accurate reproduction of all hues.
Choosing between the two types of films depends on the desired aesthetic and subject matter. For landscapes or portraits where subtle tonal variations and accurate color rendition are crucial, panchromatic films are preferred. Meanwhile, orthochromatic films may be favored for specific artistic effects or when aiming to emphasize certain elements within a scene, such as enhancing contrast in foliage or creating dramatic skies.
Ultimately, understanding the characteristics of orthochromatic and panchromatic films empowers photographers to select the most suitable medium for their creative vision, ensuring that their black and white images convey the desired mood and expression with precision.
Orthochromatic film is simply made with silver halide crystals, which are naturally blue-sensitive. First produced in 1873, early film photos and movies used orthochromatic film, which is the reason why skies in early photographs are almost always white: being blue, they overexposed easily. The orthochromatic film couldn’t see a red light, so anything red would turn black.
As technology and chemistry evolved, Panchromatic film was introduced around 1906 and was created with sensitizing dyes to extend the silver halide crystal sensitivity into the green and red portions of the spectrum. Panchromatic, meaning wide color, is now the popularly used film, capturing a wider spectrum of light, rending B&W tones close to what we see in everyday life.
19 January 2024
How to take great photos in the Snow.
Capturing stunning photographs in the snow requires a keen understanding of the unique challenges posed by the bright, reflective landscape. As you embark on your snowy photography adventure, mastering the art of exposure is crucial to achieving the perfect shot.
One of the key considerations when shooting in the snow is compensating for the intense brightness. Your light meter plays a vital role in determining the correct exposure, and a slight adjustment is often necessary. Modern digital cameras have advanced light meters and the ability to see your shot. These light meters have a computer chip with thousands of scans programmed into them to assist the camera in choosing how to meter a scene. Your average old film camera does not have near the functionality to compose a shot and you are in the dark so to speak on what your shot will look like until you develop the film. Film camera light meters are made in such a way as to only see black and white. They try to average the scene to an 18% grey. Which is about the same color as a navy battleship. So, When a scene is dark, the reading you will get drives the meter to expose for that 18% grey. Without any correction and adjustment by you the photographer, and your picture will turn out overexposed. You have to underexpose a dark subject to get it to the shade you desire. That same rule applies for a very light object or scene. Like one that is snow covered. The light meter thinks that the exposure is too light and tries to compensate by giving the exposure value that will drive you towards that 18% grey. Meaning, your snow scene will appear dark or muddier than the white that your eye would naturally see normally. To compensate, you need to over expose. To achieve optimal results, set your light meter compensation to +1.5 to +2 stops over what your meter is giving you in snowy conditions. This compensates for the reflective nature of the snow, preventing your images from appearing underexposed and ensuring that the delicate details of the winter wonderland are beautifully preserved.
Exposing your film one and a half to two stops over the standard meter reading might initially seem counterintuitive, but it's a tried-and-true technique to capture the true essence of snowy scenes. The additional exposure accounts for the abundance of white in the frame, allowing you to showcase the subtle textures and shades present in the snow-covered landscape.
When framing your shot, pay attention to the interplay of light and shadows on the snow. The glistening snow crystals can create a mesmerizing play of reflections, adding depth and dimension to your photographs. Experiment with different angles to capture the magical quality of sunlight dancing on the snow's surface.
As you venture into the snowy outdoors, keep in mind the importance of protecting your equipment from the cold. Cold temperatures can affect battery life and camera performance, so ensure you have spare batteries and keep your gear insulated when not in use.
Armed with these tips, you're ready to embark on a snowy photography expedition. Embrace the winter landscape, experiment with exposure settings, and let your creativity shine through as you capture the enchanting beauty of the snow-covered world. Happy shooting!
17 January 2024
Exploring the Art of Colored Filters in Film Photography
Introduction:
In the world of film photography, creativity knows no bounds. One fascinating aspect that allows photographers to enhance their images is the use of colored filters. These filters, when applied to film cameras, can not only add a touch of artistry to photographs but also play a crucial role in manipulating exposure and achieving specific visual effects.
Understanding Filter Factors and Exposure:
Before delving into the effects of colored filters, it's essential to comprehend filter factors and their impact on exposure. Filter factors represent the amount of light a filter absorbs or transmits. Colored filters, each with its unique hue, affect the exposure by altering the wavelengths of light that reach the film.
- Filter Factors:
- Filters are classified by their color, with each color having a corresponding filter factor. For instance, a red filter typically has a higher filter factor than a yellow filter. This means that more light is absorbed by the red filter, requiring a longer exposure time to compensate for the reduced light reaching the film. For instance, a filter having a Filter Factor of 4 would mean you would have to add two stops of light (overexpose your meter reading) to your scene. A Filter Factor of 2 would mean you would have to add one stop of light to your scene to make up the reduction in light caused by your filter.
- Exposure Compensation:
- When using colored filters, photographers need to adjust their exposure settings to ensure accurate and well-balanced results. This adjustment is critical for maintaining proper tonal values and avoiding underexposed or overexposed images.
Effects of Colored Filters on Film Photography:
Now, let's explore the intriguing effects that colored filters can bring to film photography:
- Contrast Enhancement:
- Colored filters, such as red or orange, can significantly enhance contrast by darkening the sky and emphasizing cloud formations. This effect is particularly useful in landscape photography, adding drama and depth to the scene.
- Black and White Photography:
- In black and white photography, colored filters play a pivotal role in tonal separation. For example, a red filter will darken blue skies and lighten red hues, creating a striking contrast between different elements in the frame.
- Mood and Atmosphere:
- Filters like warming or cooling filters can influence the overall mood and atmosphere of an image. Warming filters, such as tobacco or sepia, add a nostalgic and warm tone, while cooling filters, like blue, evoke a colder and more serene ambiance.
- Color Correction:
- Colored filters are also employed for color correction purposes. For instance, a magenta filter can help correct greenish casts in certain lighting conditions, contributing to more accurate color reproduction.
Effects of Colored Filters on Contrast on Black and White Film:
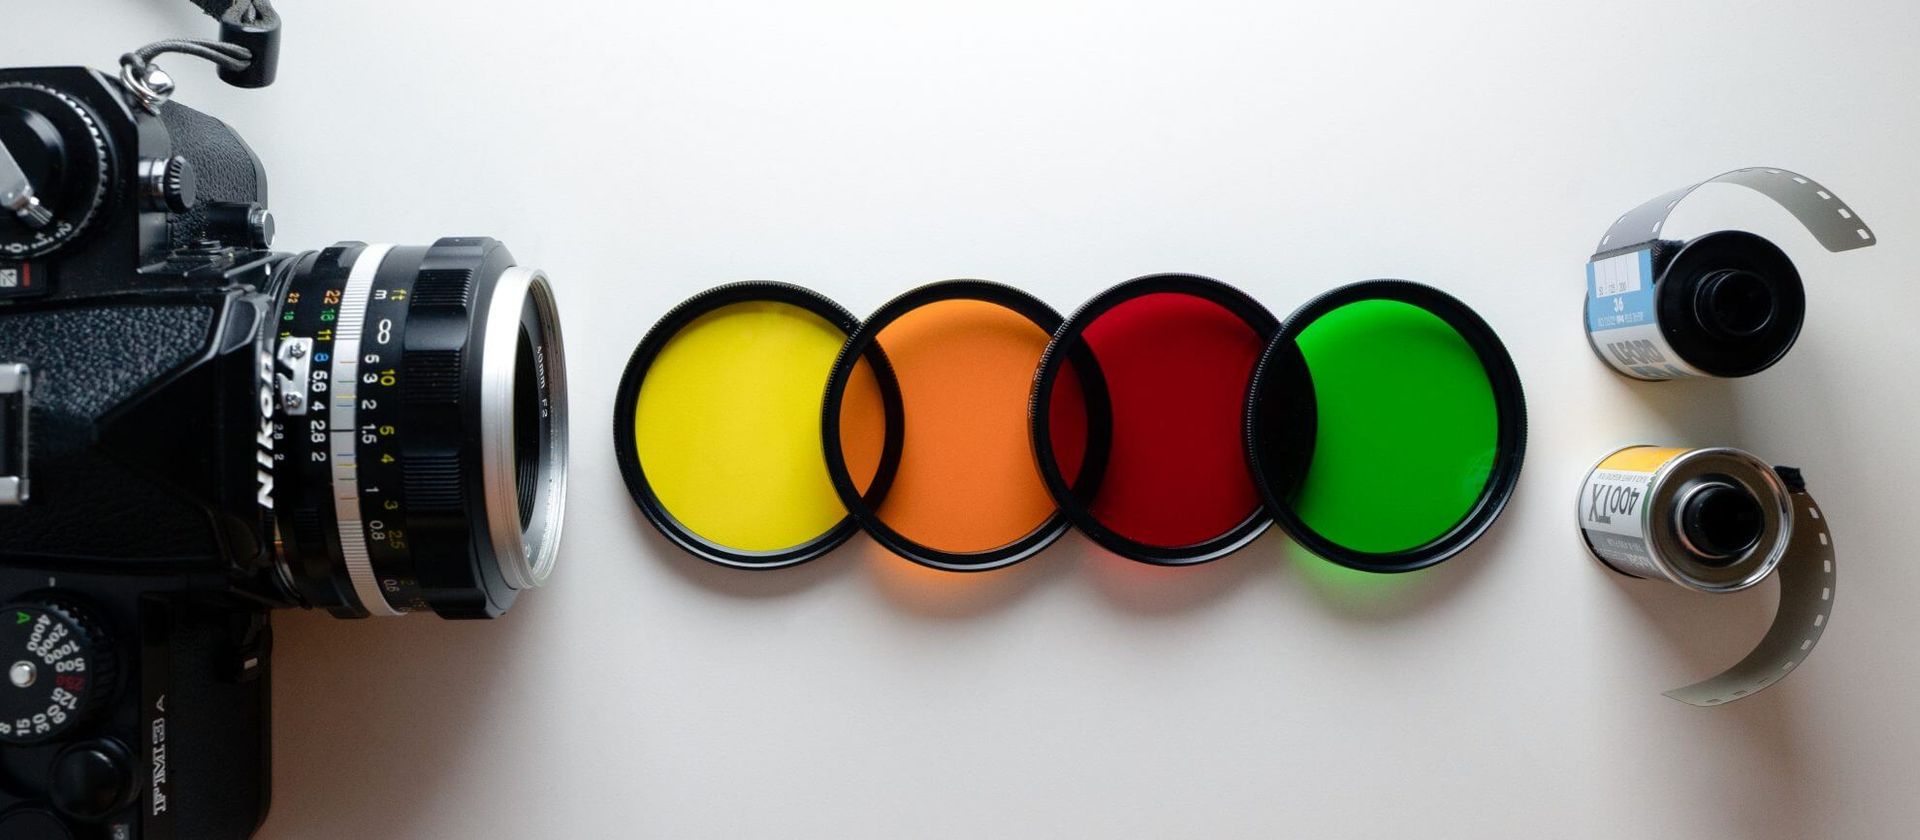
- Red Filters:
- Red filters are known for their significant impact on contrast. They absorb blue and green wavelengths of light, resulting in a darkening effect on the sky. This makes red filters ideal for landscape photography, enhancing cloud definition and creating a striking contrast between the sky and other elements.
- Orange Filters:
- Similar to red filters, orange filters also increase contrast by absorbing blue light. They are versatile and can be used in various situations, providing a balance between the darkening effect of red filters and the subtlety of yellow filters. Angel Adams used red and orange filters for many of his black and white photographs.
- Yellow Filters:
- Yellow filters are milder in their contrast-enhancing effects compared to red and orange filters. They absorb mainly ultraviolet and blue light, offering a subtle darkening of the sky while preserving natural skin tones. Yellow filters are commonly used for portraiture and general-purpose photography.
- Green Filters:
- Green filters have the opposite effect, reducing contrast by lightening foliage and darkening skies. These filters are often employed in nature photography when the goal is to emphasize the greenery.
Warming Filters, Cooling Filters, and Film Types:
- Warming Filters:
- Warming filters, such as tobacco or sepia, are used to add a warm tone to images. When used with slide film (also known as reversal or transparency film), warming filters can enhance the richness of warm colors like reds and yellows, providing a nostalgic and inviting feel to the photographs. Slide film is renowned for its vibrant colors, and warming filters complement this characteristic.
- Cooling Filters:
- Cooling filters, like light blue filters, are employed to add a cooler tone to images. When shooting with tungsten balanced films (films designed for use with indoor lighting, which is typically tungsten), cooling filters can help correct the warm color temperature associated with tungsten lighting. This is particularly useful when shooting outdoors or in mixed lighting conditions.
- Slide Film and Tungsten Balanced Films:
- Slide film is known for its high contrast and vibrant colors and tend to be on the cool side. This is to compensate of the tungsten light bulb used in slide projectors. When using warming filters, photographers can amplify the warm tones inherent in slide film, creating a nostalgic and visually appealing effect.
- Tungsten balanced films, designed for indoor lighting, have a color temperature around 3200K. When shooting outdoors in daylight, cooling filters help correct the color balance, ensuring accurate and natural-looking colors.
In conclusion, understanding the specific effects of colored filters on contrast and the strategic use of warming and cooling filters with different film types contribute to the versatile toolkit available to film photographers. These filters not only allow for creative expression but also enable photographers to fine-tune the visual characteristics of their images based on the desired mood and atmosphere.
19 April 2023
A word about how to expose your film
C-41 color negative film is a popular choice among photographers due to its versatility and ability to produce high-quality images with accurate colors and fine details. However, getting the proper exposure with this type of film can be challenging, especially when dealing with shadows and highlights.
Proper exposure is essential when working with C-41 color negative film. One of the key factors to consider is how to rate your film. Generally, C-41 color negative film has a box speed rating, which indicates the recommended ISO or ASA setting for your camera. However, some photographers prefer to rate their film one or two stops lower than the box speed to achieve a more accurate exposure. Normally buy rating their film at half the box speed so that a 400 box speed film is shot at 200, and a 200 box speed film being rated at 100. With disposable or point and shoot cameras that may not be possible as the camera automatically reads the DX code on the roll of film and sets the box speed for you automatically. Full feature cameras allow you to rate your film manually or you can just over expose your film by one stop with aperture or shutter speed.
Overexposing the film means exposing it to more light than what is recommended for the box speed rating. This technique can help bring out details in the shadows and create a more balanced exposure. However, overexposure can also result in a loss of contrast and saturation in your images, so it is important to find the right balance.
Pushing the film by one or more stops is another technique that can help open up the shadows in your images. Pushing the film means developing it for a longer time than what is recommended for the box speed rating, effectively increasing the film's sensitivity. This technique can also result in increased contrast and saturation in your images.
When working with digital photography, it is important to be careful not to overexpose the image, as it can result in blown out highlights. With C-41 color negative film, on the other hand, the main concern is blocking out the shadows. This is because digital sensors has a wider dynamic range than color negative film, which means it can capture more details in the shadows. However, it is still better to overexpose the film rather than to underexpose the shadows, as it is much more difficult to recover details from underexposed areas.
In conclusion, getting the proper exposure with C-41 color negative film requires careful attention to detail and an understanding of the film's unique characteristics. By rating your film, overexposing it to open up the shadows, and pushing it when necessary, you can create stunning images with accurate colors and fine details. Remember to always be mindful of the highlights and shadows in your images and find the right balance for your particular subject and shooting conditions.
How to store your film for best results
Photographic film is a delicate material that requires proper storage to maintain its quality and ensure reliable performance. Whether you're a professional photographer or an amateur enthusiast, learning how to store your film correctly is essential for getting the best results from your photography.
Here are some tips for storing photographic film:
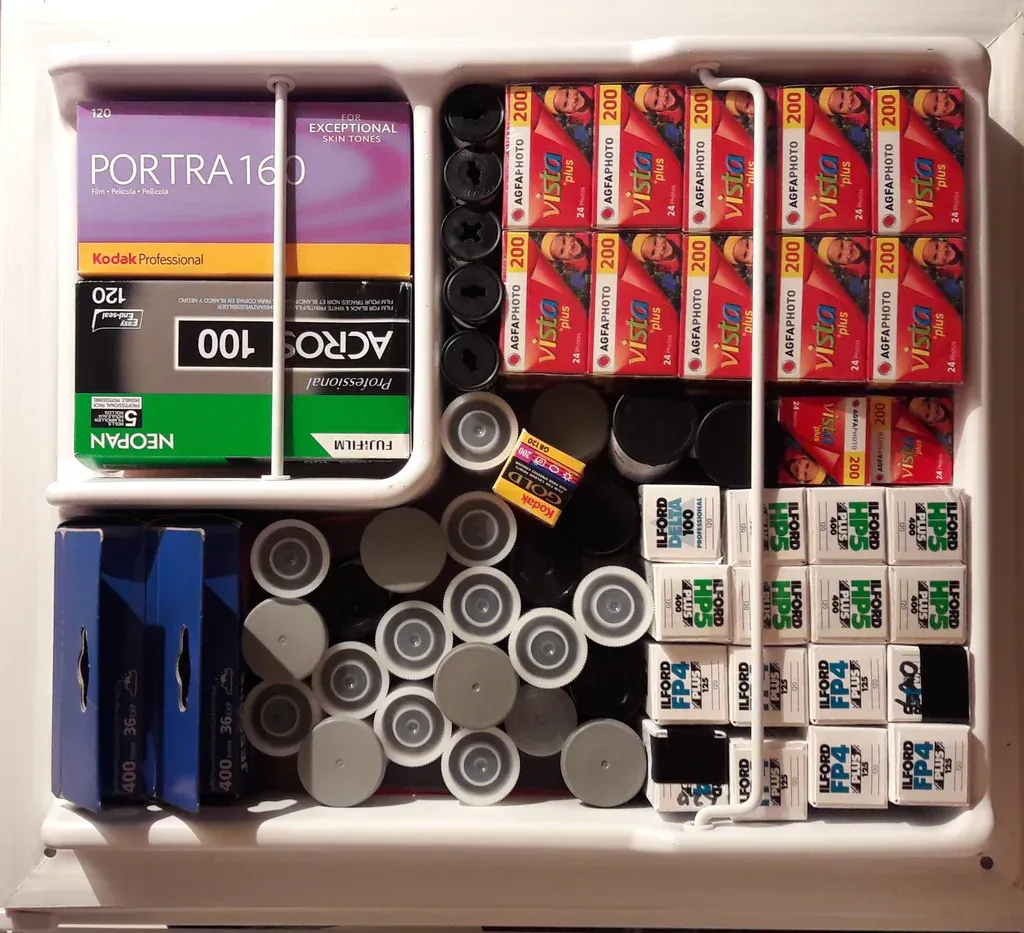
- Keep film in a cool, dry place: High temperatures and humidity can cause film to deteriorate quickly. Store your film in a cool, dry place away from direct sunlight, heat sources, and moisture.
- Check the expiration date: Film has a shelf life, and it's important to check the expiration date before using it. Expired film can result in poor image quality, color shifts, and other issues.
- Refrigerate film: Storing film in the refrigerator can help prolong its shelf life. It's best to use a sealed container or bag to protect the film from moisture and odors. Keep in mind that film should be brought to room temperature before use to avoid condensation on the film.
- Freeze film: Freezing film can greatly extend its shelf life. When stored in a freezer, film can last for years beyond its expiration date. However, it's important to use airtight containers or bags and to thaw the film slowly before use to avoid condensation.
- Store film separately from chemicals: Film can be damaged by fumes from chemicals, so it's important to store it separately from other photography supplies. Keep film in a separate drawer or container away from chemicals like developer, fixer, and stop bath.
Proper storage is crucial for maintaining the quality of photographic film, and following these tips can help ensure that your film lasts as long as possible. Remember to always check the expiration date before using film, and to keep it in a cool, dry place away from heat, moisture, and chemicals. Storing film in the refrigerator can help prolong its shelf life, while freezing it can greatly extend its longevity. With the right storage techniques, you can enjoy high-quality images from your photographic film for years to come.
13 January 2024
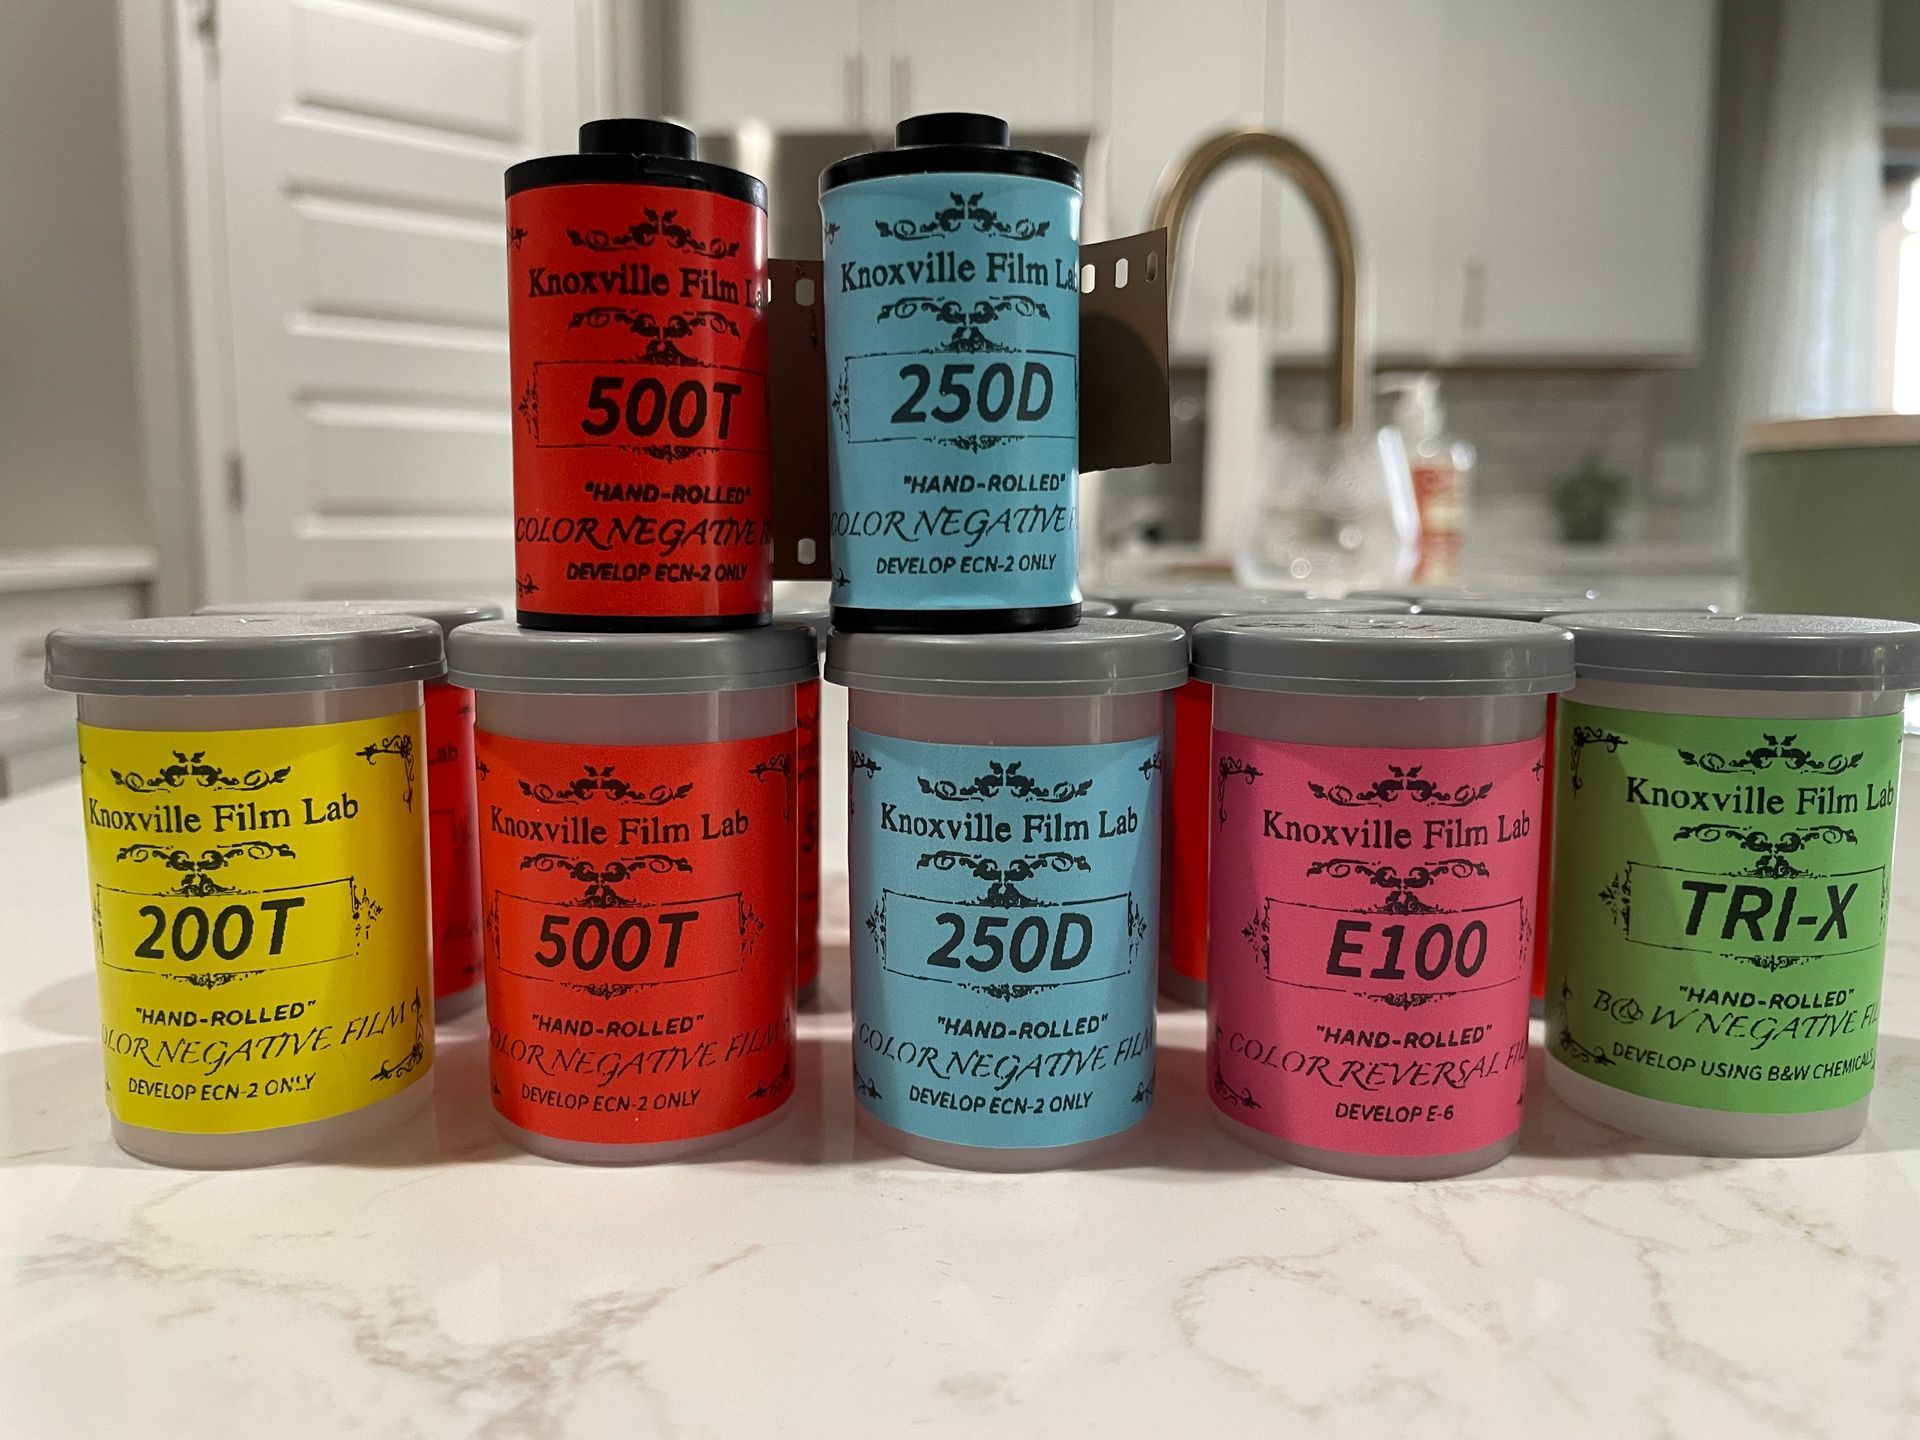
Knoxville Film Lab is selling it’s own hand rolled film!!
In an effort to “Keep film affordable” KFL has launched its own line of hand rolled Kodak films. What we do is buy large batches of fresh Kodak film from suppliers, hand roll it into disposible cassettes, and pass the savings on to you. A larger part of what makes most films expensive is marketing and packaging. Since we are able to buy large quantities of film direct from the Distributers at a discounted price, we are able to pass that savings on to you. It is the same exact, fresh, Kodak film that you would buy with Kodak branding that you would buy on our site or from other retailers. Only the sticker has changed.
We are able to offer ECN-2 movie films, seen in blockbuster hit movies and are able to roll this film on 35mm cassettes that will fit all 35mm cameras.
We also offer Ektachrome E100 E-6 color reversal (slide film) with a positive negative (if that makes sense) where it can be scanned or seen in a positive (real picture) right on the film strip after processing. Pretty cool!!
And last but not least, Kodak’s tried and true TRI-X 400 Black and White panchromatic film. Tri-x is one of Kodak’s most beloved and classic film used for decades by professional photographers around the world. It is the most popular B&W film Kodak sells.
New films will be added to the KFL had rolled areana in the coming months but you can now take advantage of the bulk film price.